WOLFRAM NOTEBOOK

Introduction to Transfer Learning

Classifying Photographs vs. Drawings

Overview

Problem

Here we show how to develop a deep learning algorithm to classify images given any small labeled dataset. To demonstrate the procedure, we train a classifier to identify whether an input image is photograph of a real object or whether it is a painting/drawing. We use a technique called transfer learning to do this.

Transfer Learning

Humans are able to learn very quickly to identify something after being shown only a few examples because we can utilize our existing knowledge about the world to solve new problems. This ability to transfer knowledge learned for one task in one domain to another task in a different domain is called transfer learning.
Typically machine learning algorithms do not generalize well to situations very different from the data that is used for training. Furthermore, they typically require large amounts of labeled data to achieve good performance when trained from the ground up.
However, convolutional neural nets trained on images learn to detect simple feature such as edges, corners, color blobs, etc., in their early layers. These features are useful for all kinds of image processing tasks. Therefore, we can reuse these nets already trained on a large dataset of images such as ImageNet, and fine-tune them to build a classifier for a new problem using only a few labeled elements.

Data

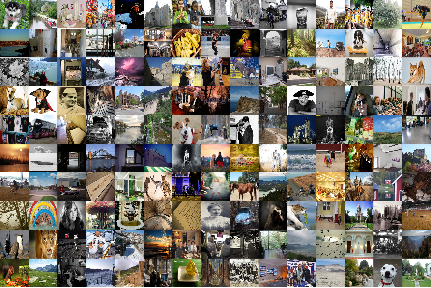
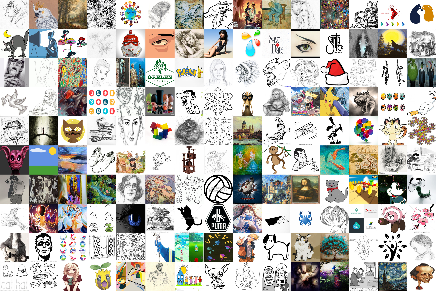
A dataset of photographs and drawings can be easily obtained by searching on the web (e.g. Google Image Search) or using the function WebImageSearch. Here, we have already scraped some photographs and drawings and shown below.

Photos

Getting 150 images of photographs by partitioning the image below and labeling each of them “Photo”.
photos=Flatten@ImagePartition
,{224,224}"Photo"//Thread;

Drawings

Getting 150 images of drawings from the image below and labeling them “Drawing”
drawings=Flatten@ImagePartition
,{224,224}"Drawing"//Thread;

Splitting into Training and Testing Data

Randomly shuffing and then splitting the dataset into 200 images for training and 100 images for testing.
{trainingData,testData}=TakeDrop[RandomSample@Join[drawings,photos],200];
Having a separate test set is essential since it ensures that the algorithm is not simply memorizing the image shown to it without generalizing to unseen images.

Designing Net

Pre-trained Net Model

We download the convolutional neural net used in ImageIdentify(https://www.imageidentify.com), which is already trained on millions of images to classify objects belonging to thousands of different classes.
preTrainedNet=NetModel["Wolfram ImageIdentify Net for WL 11.1"]
NetChain
Input
image
3-tensor (size: 3×224×224)
conv_1
ConvolutionLayer
3-tensor (size: 64×112×112)
bn_1
BatchNormalizationLayer
3-tensor (size: 64×112×112)
relu_1
Ramp
3-tensor (size: 64×112×112)
pool_1
PoolingLayer
3-tensor (size: 64×55×55)
conv_2_red
ConvolutionLayer
3-tensor (size: 64×55×55)
bn_2_red
BatchNormalizationLayer
3-tensor (size: 64×55×55)
relu_2_red
Ramp
3-tensor (size: 64×55×55)
conv_2
ConvolutionLayer
3-tensor (size: 192×55×55)
bn_2
BatchNormalizationLayer
3-tensor (size: 192×55×55)
relu_2
Ramp
3-tensor (size: 192×55×55)
pool_2
PoolingLayer
3-tensor (size: 192×27×27)
3a
NetGraph[23]
3-tensor (size: 256×27×27)
3b
NetGraph[23]
3-tensor (size: 320×27×27)
3c
NetGraph[17]
3-tensor (size: 576×14×14)
4a
NetGraph[23]
3-tensor (size: 576×14×14)
4b
NetGraph[23]
3-tensor (size: 576×14×14)
4c
NetGraph[23]
3-tensor (size: 608×14×14)
4d
NetGraph[23]
3-tensor (size: 608×14×14)
4e
NetGraph[17]
3-tensor (size: 1056×7×7)
5a
NetGraph[23]
3-tensor (size: 1024×7×7)
5b
NetGraph[23]
3-tensor (size: 1024×7×7)
global_pool
PoolingLayer
3-tensor (size: 1024×1×1)
linear
LinearLayer
vector (size: 4315)
softmax
SoftmaxLayer
vector (size: 4315)
Output
class
Null
Null
This is a convolutional neural network architecture called Inception, which is very fast to train and evaluate.

Truncating Net

The number of neurons in the final linear layer should be equal to the number of classes of objects. Therefore, we remove the layers at the end which were designed to perform classification on over 4000 images. This truncated net is known as a feature-extractor since it maps any input image into a vector of real numbers encoding useful properties about the image.

Attaching Classifier

Now we create a new net by attaching 2 neurons and a Softmax layer to create a classifier for two classes. The softmax layer ensures that probabilities of each class is the output. We attach a NetDecoder to the output to convert the probabilities to the class names.
This net takes an image as input and outputs a class which is either “Photo” or “Drawing”.

Training

Now we train this new net on our dataset. This procedure is called fine-tuning since the net contains weights already pre-trained on a larger dataset.

Net Train

Using a GPU speeds up the training by over 15x. If a GPU is not available, the TargetDevice option can be removed or set to “CPU”.

Testing

Classifier Measurements

Computing performance of the fine-tuned net model.
The accuracy is also shown above in the ClassifierMeasurementsObject. This is an object from which you can query all kinds of properties about how the model performs on the test set.

Confusion Matrix

A confusion matrix shows the distribution of predictions on the test set across each class. The diagonal entires show the number of correctly classified elements.

Misclassified Examples

All the examples in the test set which were classified incorrectly are shown below.

Comparisons

Net Train without Transfer Learning

We reset the net model with random initialization to erase the pre-trained knowledge. Then we train the net in the same manner as before for comparison.
Computing accuracy on the test set.
We can see that without transfer learning the net model performs much worse than before on the same dataset.

Classify with Raw Pixels

Training the built-in Classify functions on a vector of raw pixels without using any feature extractors for images.
Computing the accuracy with the raw pixels as inputs for each image in the test set.

Classify with Image Features

Training Classify on the same training set, which by default uses a built-in feature extractor for images.
Computing the accuracy on the same test set.
We achieve a slightly higher accuracy with the built-in Classify function. This is because Classify internally uses a pre-trained net model to extract features from the images before training the classifier. The difference is that we have fine-tuned every layer in the net, whereas Classify trains a machine learning algorithm on the outputs of the net, keeping each layer fixed.

Conclusion

We have introduced the concept of transfer learning and demonstrated how it can be used for the simple problem of classifying whether an input image is a photograph or not. We achieved 93% accuracy with a small training dataset containing only 100 images of each class. Furthermore, we show that the transfer learning achieves significantly better results compared to training the net from scratch or using other machine learning methods.
This technique can be applied to many kinds of image classification problems, even when the new dataset is completely different from the original dataset used to pre-train the net models.
Wolfram Cloud

You are using a browser not supported by the Wolfram Cloud

Supported browsers include recent versions of Chrome, Edge, Firefox and Safari.


I understand and wish to continue anyway »

You are using a browser not supported by the Wolfram Cloud. Supported browsers include recent versions of Chrome, Edge, Firefox and Safari.